
はじめに
久しぶりにまじめな話を。(真面目過ぎてQiitaで投稿すべきでは?とも思った)
総合開発環境(IDE)の一つであるMicrosoftのVisual Studio。(IDEって何?って人にはテキストエディタだと思ってもらえば良い)
主にWindows の .NET および C++のソフトウェア開発に用いられており、分野にも依るが使っている技術者は多いのではないだろうか?
まぁ、一番人気で日本での使用者が多い(多分)IDEは、Visual Studio Code、所謂VSCodeであり、こっちの方が慣れている人も多いだろう。ぼくもどちらかといえばVSCode派だ。Visual Studioの方は重いし、UIは複雑だし、VSCodeならWSLを活用できるし、対応してる言語も多いし、カスタマイズが簡単だし……。と上げればキリは無いのだが、とにかくぼくはVisual StudioよりもVSCodeが良い!という人だった。
だが、プロジェクトによってはやれ商用利用だ法人契約だNDAだ著作権だ etc. と、色々と制約があり、急遽Visual Studioに慣れる必要が出てきた。(正直VSCode使っても全く問題は無い気はするが、それ使ってトラブルが起きた時に矢面に立つのが面倒くさいのでVisual Studioを使っている)
最初は苦戦しつつもなんとかVisual Studioでの開発に慣れてきた……のだが、それでも許せない点が。
ショートカットキーをVSCodeのものに変更できない!
同じMicrosoftのIDEなのに、ショートカットキーの動作が違う……くらいなら許していた。設定変えれば同じように使えるからね。
しかし、残念ながらVSCodeでデフォルトで設定されていたショートカットキーのいくつかは、Visual Studioにて、実装すらされていない。これでは設定し直すことも出来ない。
ぼくがVSCodeで良く使っていたショートカットキーの内、Visual Studioに実装すらされていないものは、
- 行全体を選択する Ctrl + L
- 行のインデント解除 Ctrl + [
- 行のインデント Ctrl + ]
など。このあたりは、Visual Studioに移行した後、何度も使いたくなった機能だ。
(一応、この3つはマルチカーソルはHOME、ENDキーに慣れれば十分代替できるものであることは理解しているが……)
でもって、これを解決するVisual Studioの拡張機能を……と思うとこれまた制約のせいで拡張機能のダウンロードはグレーゾーン。
……こうなったら、自分で拡張機能を作るしかねぇ!
※私は本記事によって発生したいかなる不具合についてもその責任を負いません。拡張機能の開発は自己責任でお願いします。
環境
- Windows11
- Visual Studio 2019 Community
バージョンは適当。単に2019が自分のPCにインストールされていたので2019にしただけ。(業務ではないのでCommunityでやっている)
現在の最新は2022なので、ちょっと違うかもしれない。
やること
Visual Studioの拡張機能の開発を用いて、「行全体を選択する」コマンドを作成する。
作ったコマンドをCtrl + Lに割り振り、動作を確認する。
手順
実際に自分好みの拡張機能の開発も視野に入れている人は、公式のドキュメントも参照してほしい。途中から読むと意☆味☆不☆明になる可能性があるので、わからなくなったら最初の方から読んでみることをオススメする。特にVSSDKのリファレンスの内必要な機能はちゃんと読んでおこう!
チュートリアル – 最初の拡張機能を作成する: Hello World
まずは環境のセットアップから。
Visual Studio Installerを用いて、Visual Studioのインストール、及び拡張機能に必要なパッケージをインストールする。

今回は拡張機能を作るので、「Visual Studio 拡張機能の開発」にチェックを入れればOK!
インストールが終わったら、早速プロジェクトを作成する。
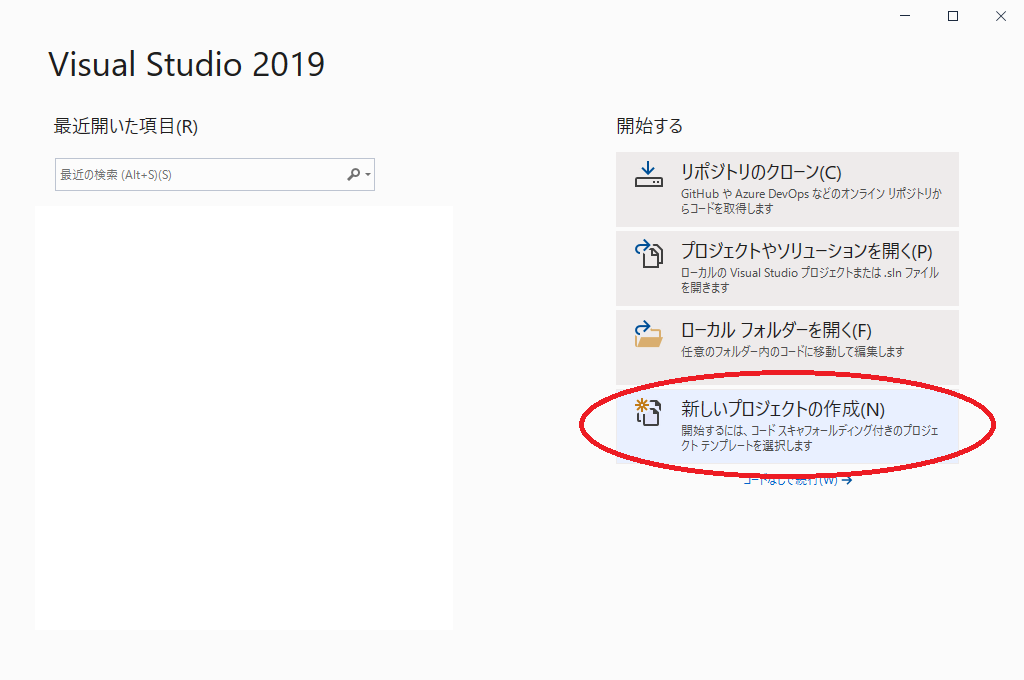
選ぶのはC#のVSIX Project。Visual BasicにもVSIX Projectはあるが、ぼくはVisual BasicよりもC#の方がまだわかるので、C#を選択。
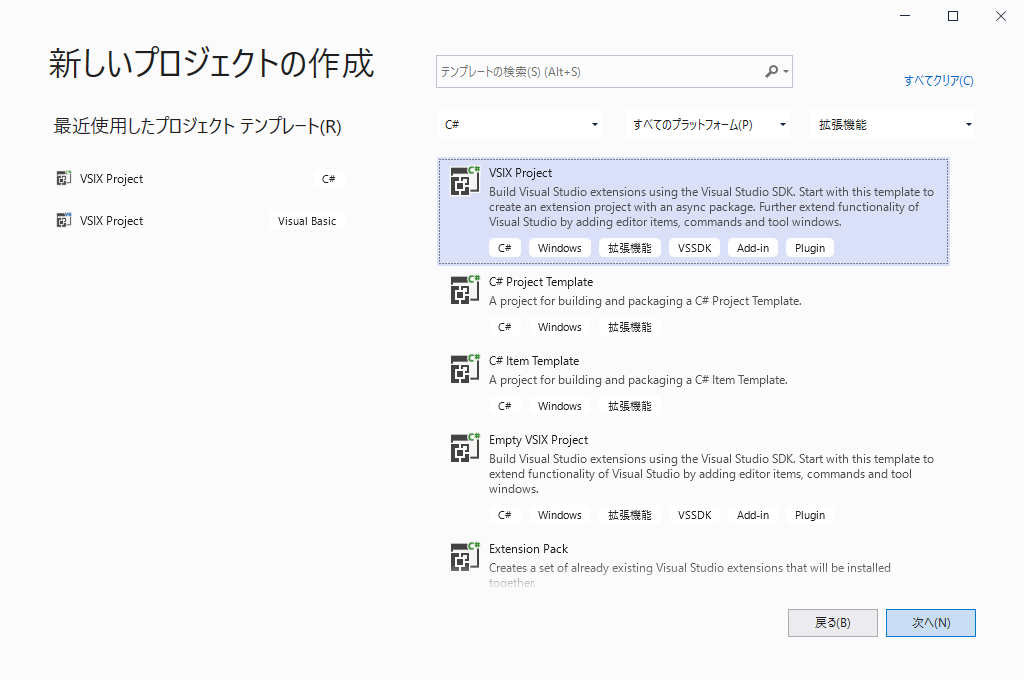
バージョンによってUIが全然違うと思うが、”拡張機能”を選んだり、テンプレートの検索に”VSIX”と入力すれば出てくると思う。
次へ、を押して、好きなプロジェクト名などを入力。今回はプロジェクト名、ソリューション名どちらもSelectLineにした。
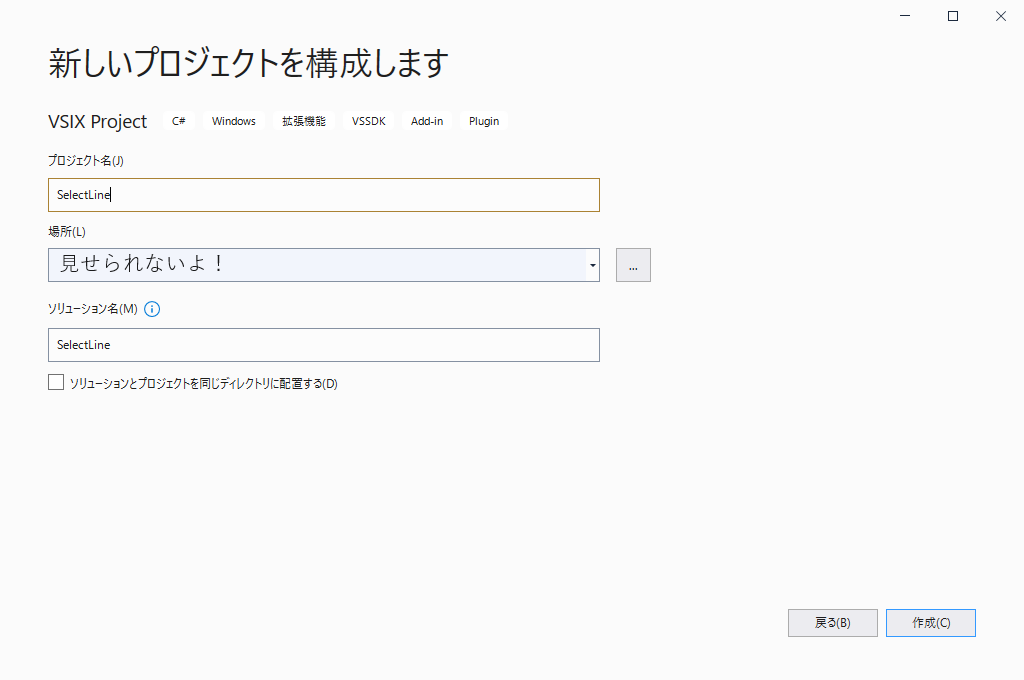
これで作成を押せばVisual Studioのプロジェクトが立ち上がる。立ちあがった中身に、SelectLinePackage.csとsource.extension.vsixmanifestファイルが入っていればOK。
(source.extension.vsixmanifestは配布する際のライセンスや製作者の名前を決めるファイルなので、配布する予定があるならこのファイルも編集しておこう!)
環境のセットアップはこれで終わり。次はコマンドを実際に追加する。
といってもやることは簡単で、既にコマンド用のテンプレートが用意されているので、それを利用すればOK!
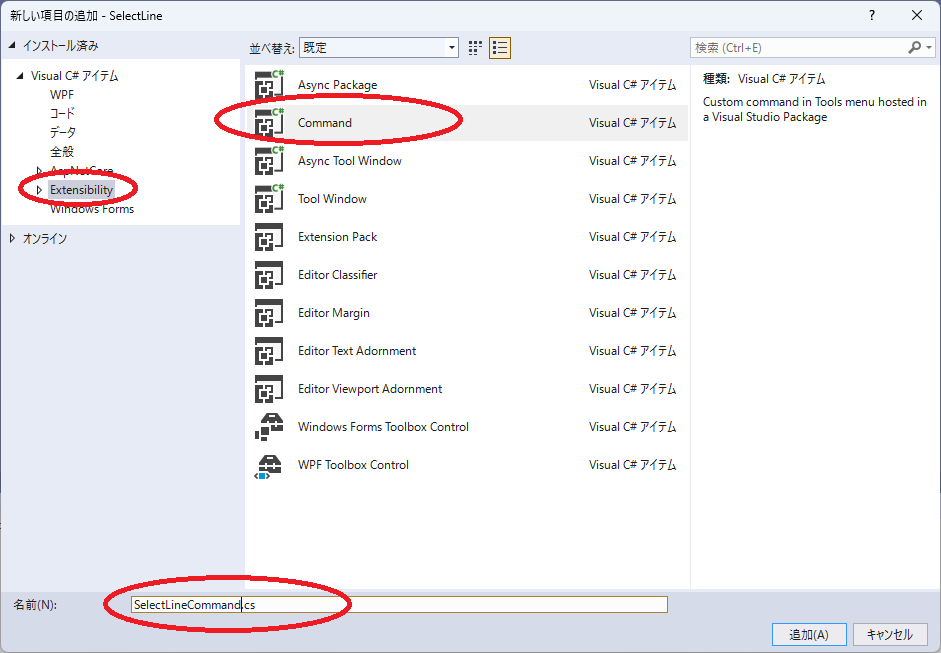
ソリューションエクスプローラーを右クリックして追加→新しい項目の順に選ぶ。
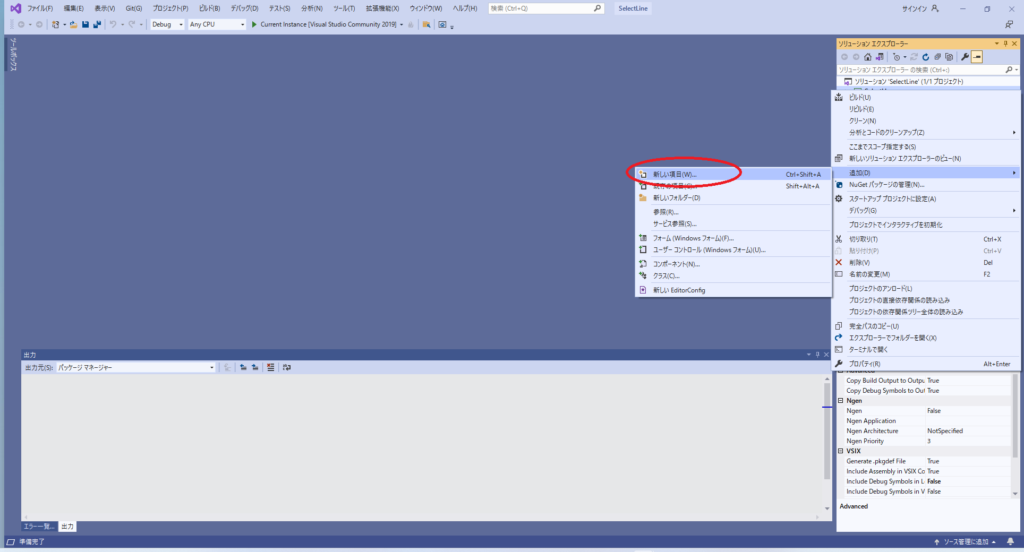
次に、Extensibilityを選び、出てきた候補の中から、Commandのテンプレートを選択。適当な名前を付けて追加する。
今回はSelectLineCommandとした。
すると、新しくSelectLineCommand.cs ファイルと、SelectLinePackage.vsct ファイルの2つが新規で追加されている。
なんと、このCommandのテンプレートを選ぶだけで、Visual Studioのコマンドとして使える用意が整うのだ!凄い!
なので、あとは実際の処理と細かい処理を書くだけ。
まずは処理の方……SelectLineCommand.cs から。
まずは、ファイル先頭でテキストエディタとして使う機能をusing宣言。
using Microsoft.VisualStudio.TextManager.Interop; // 追加
using Microsoft.VisualStudio;                     // 追加
ついでに今回使わない宣言を消しておこう。
using Microsoft.VisualStudio.Shell.Interop; // 消す
using System.Globalization;                 // 消す
using System.Threading;                     // 消す
using System.Threading.Tasks;               // 消す
あと、今回はMicrosoft.VisualStudio.ShellのServiceProviderを使いたいのだが、Commandテンプレートを追加した時に、勝手に追加される関数ServiceProviderと名前が衝突してしまっている。今回はこの関数は使わないので関数毎消してしまおう。
private Microsoft.VisualStudio.Shell.IAsyncServiceProvider ServiceProvider // 消す
{
    get
    {
        return this.package;
    }
}
ここまでお膳立て出来たら、後はコマンドとして登録した関数の実行時の処理を書くだけ。
実行時の処理が書かれているのはExecute関数なので、ここを以下のように書き換える。コードの解説はしません。コメントに全部書いてあるからね。(もっと良いやり方はあるかもしれないが……)
private void Execute(object sender, EventArgs e)
{
    ThreadHelper.ThrowIfNotOnUIThread();

    // IVsTextManagerの取得
    IVsTextManager textManager = (IVsTextManager)ServiceProvider.GlobalProvider.GetService(typeof(SVsTextManager));
    if (textManager == null)
    {
        return;
    }

    // IVsTextViewの取得
    int hr = textManager.GetActiveView(1, null, out IVsTextView textView);
    if (textView == null)
    {
        return;
    }

    // カーソル位置取得
    textView.GetCaretPos(out int line, out int column);

    // 最終行を取得
    textView.GetBuffer(out IVsTextLines textLines);
    IVsTextStream textStream = (IVsTextStream)textLines;
    textStream.GetLastLineIndex(out int lastLineIndex, out int lastIndex);

    // 現在の選択範囲を取得
    int errorCode = textView.GetSelection(out int piAnchorLine, out int piAnchorCol, out int piEndLine, out int piEndCol);

    // 選択がない場合
    if (errorCode != VSConstants.S_OK)
    {
        piAnchorLine = line;
        piEndLine = line;
    }

    // 新しい選択位置の決定
    piAnchorCol = 0;
    piEndLine++;
    piEndCol = 0;

    // 選択範囲が最終行を超える場合、最終行の最後までを選択位置にする
    if(piEndLine > lastLineIndex)
    {
        textLines.GetLengthOfLine(lastLineIndex, out int lineLength);
        piEndLine--;
        piEndCol = lineLength;
    }

    // 新しい選択位置のセット
    // SetSelectionを実行するとカーソルも動く
    textView.SetSelection(piAnchorLine, piAnchorCol, piEndLine, piEndCol);
}
これで機能の実装も終わり!
この時点で、もうコマンドとして登録もされているので、気にしない人はここで終わりでもOK!
次は.vsctファイルの方。今回は、Execute関数をコマンドとして登録したいだけだが、テンプレートを流用している都合上、このままではVisual Studioの上部メニューのツールの中に、UIで表示されてしまう。
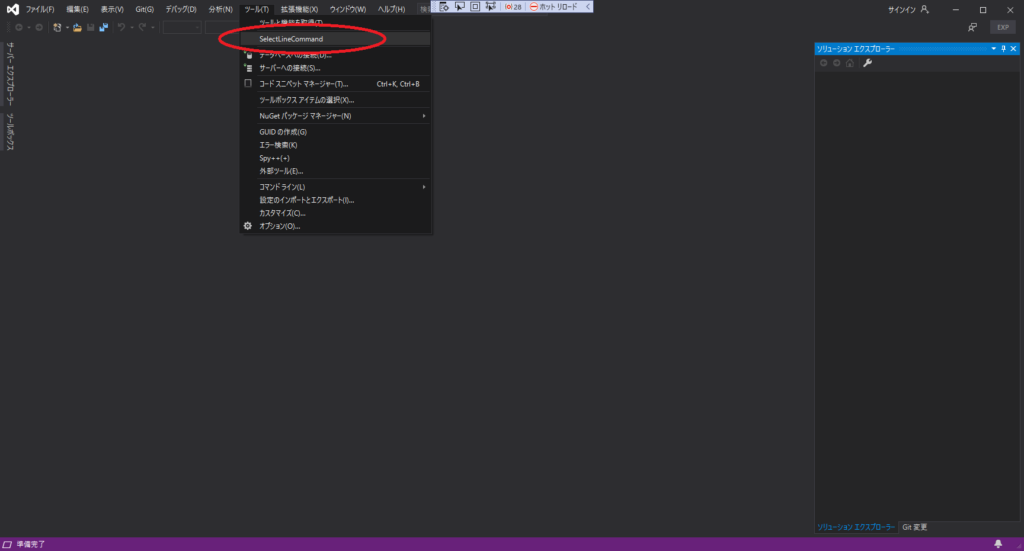
気にしない人はそれで良いのだが、コマンドとして登録されて欲しいだけなので、ツールの中に出てくる表示を消したい。
SelectLinePackage.vsct ファイルの<Commands>要素の中の、<Buttons>の中に<Button>要素が既に書かれていると思うので、ここに<CommandFlag>CommandWellOnly</CommandFlag>を追加。ボタンをUIとして表示せず、コマンドのみの利用とする。
あと、<ButtonText>要素が、コマンドの名前になるので、ここも自由に変えておこう!デフォルトだとInvoke HogeHoge になってるかな?
<Button guid="guidSelectLinePackageCmdSet" id="SelectLineCommandId" priority="0x0100" type="Button">
  <Parent guid="guidSelectLinePackageCmdSet" id="MyMenuGroup" />
  <CommandFlag>CommandWellOnly</CommandFlag> <!-- UIには表示せず、オプション->環境->キーボード から選択できるコマンドとして使用できる --> <!-- 追加 -->
  <Strings>
    <ButtonText>SelectLineCommand</ButtonText> <!-- ここで入力した文字列がコマンドの名前になる -->
  </Strings>
</Button>
ボタンとして表示しないので、vsctファイルにいっぱいあるBitmap情報やソリューション内の .pngも全部削除してしまおう。
ちなみに、この.vsctファイル内には<KeyBinding>要素も存在し、ここで要素を割り当てることも可能。ただ、今回は割り当て先を自由に変えることを想定し、コマンドのみ登録することを目的としているので、<KeyBinding>は使用しなかった。
これで必要な作業は終わり!後は動作確認だけ。
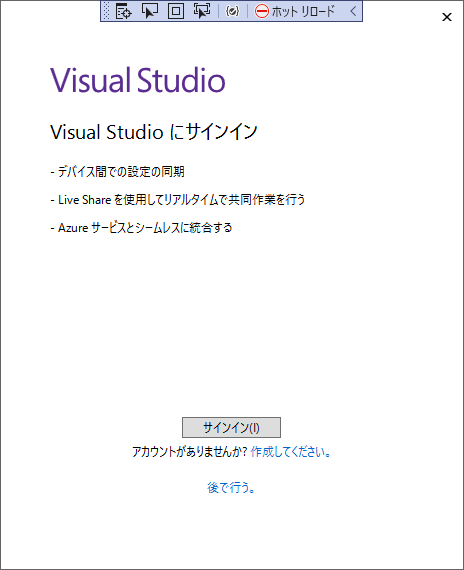
F5キーを押して、[デバッグの開始] コマンドを実行。今回はVisual Studioの拡張機能についてのデバッグなので、デバッグ用のVisual Studioが新しく立ち上がることになる。これを実験的なインスタンス、と呼ぶらしい。
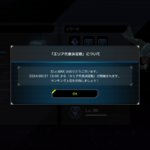
初回だとこんな感じで新規ユーザーが Visual Studioを立ち上げたかのような画面が出てくるが、デバッグ用の新しいVisual Studioなので、焦らずに、”後で行う”を選べばよい。設定などもこれまでのVisual Studioとは別フォルダに保存されるので、ここならいくら環境を荒らしても良いのだ。
あと、実験用インスタンスだと一目でわかるように、配色テーマをいつもと違うものを選ぶと良いかもしれない。ぼくは実験用インスタンスは濃色を選ぶようにしている。
実験用インスタンスが起動したら、コマンドとして登録されているか確認しよう。
ツール→オプションを開き、出てきたウィンドウで、環境→キーボードの順に選ぶ。
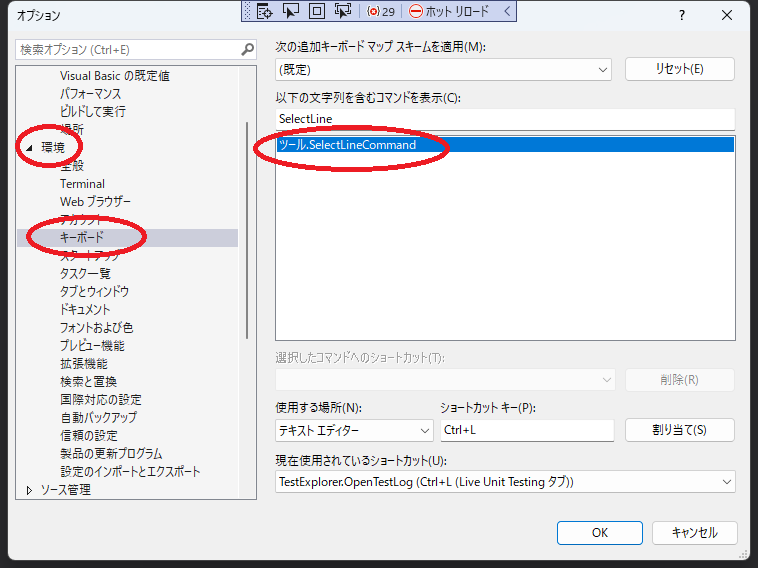
出てきた項目の中で、「以下の文字列を含むコマンドを表示」の欄の中に、自分で入力したコマンドの名前を入力して出てくることを確認する。今回だとSelectLineCommandなので、それが出てくることを確認出来ればOK!画像のように、ツール.SelectLineCommand、と表示されるはずだ。
ちなみに、ぼくは初回だと何故か出てこなかった。一度、.vsctファイルの<CommandFlag>CommandWellOnly</CommandFlag>をコメントアウトしてデバッグの開始を行い、SelectLineCommandが登録されていることを確認してから、<CommandFlag>CommandWellOnly</CommandFlag>をアンコメントしてデバッグの開始をしたら期待通りの動作になった。なんでだろう?
Releaseビルドだと一発で上手く行ったので、もしかしたらデバッグの開始ではなく、ビルド→ソリューションのリビルドが必要かも?
今回実装したコマンド、SelectLineCommandが選択出来たら、好きなコマンドと場所に割り当てればおしまい。ぼくはテキストエディタのCtrl + L に割り当てた。
実際に、実験用のVisual Studioインスタンスの中で、新規ファイルを作成し、その中でちゃんと機能するか確認して終了!お疲れ様でした。
多分VSCodeの行選択と同じ動作をするようにできたと思う。
実験用インスタンスでの変更をリセット
ちょっと関係無いかもしれないが備忘録として残しておく。
拡張機能の開発のソリューションをビルドしてデバッグの開始をすると、開発した拡張機能が実験用インスタンスにインストールされることになる。
また、動作確認のために設定の変更などが必要になった際、普段のVisual Studioと実験用インスタンスで環境が大きく変わることがあるかもしれない。特に複数の拡張機能の開発のチュートリアルをやったりすると、使わない拡張機能が沢山溜まることになる。
そんな時は、公式のドキュメントにも載っている、実験用インスタンスの環境のリセットを行う必要があるのだが、コマンドがちょっとわかりにくかったのでここに記しておく。
<VSSDK installation>\VisualStudioIntegration\Tools\Bin\CreateExpInstance.exe /Reset /VSInstance=<version> /RootSuffix=Exp && PAUSEとなっていた。CreateExpInstance.exeへのパスはともかく、<version>ってなんだ?となって悩んだ。
答えは、%AppData%\Local\Microsoft\VisualStudio (人によって違うかも)の中に、使ってるVisual Studioのバージョンが書かれたフォルダがある。ぼくの場合は、16.0_13cf7672と、16.0_13cf7672Expのフォルダが存在する。このExpの書かれていない文字列が、上記コマンドで指定する<version>だ。Visual Studio Installerに書いてあるVisual Studioのバージョンではない。
Expの方が、実験用インスタンスのフォルダであり、上記のコマンドはこのExpフォルダを削除し、Expの書かれていないフォルダをコピーして新しいExpフォルダを作成しているっぽい。
コマンドを書き直せば、
C:\Program Files (x86)\Microsoft Visual Studio\2019\Community\VSSDK\VisualStudioIntegration\Tools\Bin\CreateExpInstance.exe /Reset /VSInstance=C:\Users\XXXX\AppData\Local\Microsoft\VisualStudio\16.0_13cf7672 /RootSuffix=Exp && PAUSEとなる。ユーザー名のXXXXとバージョン、パスは自分のものに置き換えて欲しい。
このコマンドを実行すると、実験用インスタンスが元のVisual Studioと同じになるはずだ。
拡張機能のインストール
動作の確認が出来たら、元のVisual Studioの方に戻り、画面上部のDebugボタンを押し、DebugビルドからReleaseビルドに変更。
Releaseビルドを実行して、出来た.vsixファイル……制作したVisual Studioの拡張機能のインストーラーを実行するだけ。
制作した拡張機能のインストーラーは、SelectLine\SelectLine\bin\Releaseの中にあるはずだ。
ソースコード再掲
再度言うが、この記事によって起きた不都合、不具合について私は責任を負いません。自己責任でお願いします。
SelectLineCommand.cs
using Microsoft.VisualStudio.Shell;

using System;
using System.ComponentModel.Design;

using Task = System.Threading.Tasks.Task;

using Microsoft.VisualStudio.TextManager.Interop;
using Microsoft.VisualStudio;

namespace SelectLine
{
    /// <summary>
    /// Command handler
    /// </summary>
    internal sealed class SelectLineCommand
    {
        /// <summary>
        /// Command ID.
        /// </summary>
        public const int CommandId = 0x0100;

        /// <summary>
        /// Command menu group (command set GUID).
        /// </summary>
        public static readonly Guid CommandSet = new Guid("ac153145-5fe8-4263-aadd-cbcb67cbfe3d");

        /// <summary>
        /// VS Package that provides this command, not null.
        /// </summary>
        private readonly AsyncPackage package;

        /// <summary>
        /// Initializes a new instance of the <see cref="SelectLineCommand"/> class.
        /// Adds our command handlers for menu (commands must exist in the command table file)
        /// </summary>
        /// <param name="package">Owner package, not null.</param>
        /// <param name="commandService">Command service to add command to, not null.</param>
        private SelectLineCommand(AsyncPackage package, OleMenuCommandService commandService)
        {
            this.package = package ?? throw new ArgumentNullException(nameof(package));
            commandService = commandService ?? throw new ArgumentNullException(nameof(commandService));

            var menuCommandID = new CommandID(CommandSet, CommandId);
            var menuItem = new MenuCommand(this.Execute, menuCommandID);
            commandService.AddCommand(menuItem);
        }

        /// <summary>
        /// Gets the instance of the command.
        /// </summary>
        public static SelectLineCommand Instance
        {
            get;
            private set;
        }

        /// <summary>
        /// Initializes the singleton instance of the command.
        /// </summary>
        /// <param name="package">Owner package, not null.</param>
        public static async Task InitializeAsync(AsyncPackage package)
        {
            // Switch to the main thread - the call to AddCommand in SelectLineCommand's constructor requires
            // the UI thread.
            await ThreadHelper.JoinableTaskFactory.SwitchToMainThreadAsync(package.DisposalToken);

            OleMenuCommandService commandService = await package.GetServiceAsync(typeof(IMenuCommandService)) as OleMenuCommandService;
            Instance = new SelectLineCommand(package, commandService);
        }

        /// <summary>
        /// This function is the callback used to execute the command when the menu item is clicked.
        /// See the constructor to see how the menu item is associated with this function using
        /// OleMenuCommandService service and MenuCommand class.
        /// </summary>
        /// <param name="sender">Event sender.</param>
        /// <param name="e">Event args.</param>
        private void Execute(object sender, EventArgs e)
        {
            ThreadHelper.ThrowIfNotOnUIThread();

            // IVsTextManagerの取得
            IVsTextManager textManager = (IVsTextManager)ServiceProvider.GlobalProvider.GetService(typeof(SVsTextManager));
            if (textManager == null)
            {
                return;
            }

            // IVsTextViewの取得
            int hr = textManager.GetActiveView(1, null, out IVsTextView textView);
            if (textView == null)
            {
                return;
            }

            // カーソル位置取得
            textView.GetCaretPos(out int line, out int column);

            // 最終行を取得
            textView.GetBuffer(out IVsTextLines textLines);
            IVsTextStream textStream = (IVsTextStream)textLines;
            textStream.GetLastLineIndex(out int lastLineIndex, out int lastIndex);

            // 現在の選択範囲を取得
            int errorCode = textView.GetSelection(out int piAnchorLine, out int piAnchorCol, out int piEndLine, out int piEndCol);

            // 選択がない場合
            if (errorCode != VSConstants.S_OK)
            {
                piAnchorLine = line;
                piEndLine = line;
            }

            // 新しい選択位置の決定
            piAnchorCol = 0;
            piEndLine++;
            piEndCol = 0;

            // 選択範囲が最終行を超える場合、最終行の最後までを選択位置にする
            if (piEndLine > lastLineIndex)
            {
                textLines.GetLengthOfLine(lastLineIndex, out int lineLength);
                piEndLine--;
                piEndCol = lineLength;
            }

            // 新しい選択位置のセット
            // SetSelectionを実行するとカーソルも動く
            textView.SetSelection(piAnchorLine, piAnchorCol, piEndLine, piEndCol);
        }
    }
}
SelectLinePackage.vsct
<?xml version="1.0" encoding="utf-8"?>
<CommandTable xmlns="http://schemas.microsoft.com/VisualStudio/2005-10-18/CommandTable" xmlns:xs="http://www.w3.org/2001/XMLSchema">

  <!--  This is the file that defines the actual layout and type of the commands.
        It is divided in different sections (e.g. command definition, command
        placement, ...), with each defining a specific set of properties.
        See the comment before each section for more details about how to
        use it. -->

  <!--  The VSCT compiler (the tool that translates this file into the binary
        format that VisualStudio will consume) has the ability to run a preprocessor
        on the vsct file; this preprocessor is (usually) the C++ preprocessor, so
        it is possible to define includes and macros with the same syntax used
        in C++ files. Using this ability of the compiler here, we include some files
        defining some of the constants that we will use inside the file. -->

  <!--This is the file that defines the IDs for all the commands exposed by VisualStudio. -->
  <Extern href="stdidcmd.h"/>

  <!--This header contains the command ids for the menus provided by the shell. -->
  <Extern href="vsshlids.h"/>

  <!--The Commands section is where commands, menus, and menu groups are defined.
      This section uses a Guid to identify the package that provides the command defined inside it. -->
  <Commands package="guidSelectLinePackage">
    <!-- Inside this section we have different sub-sections: one for the menus, another
    for the menu groups, one for the buttons (the actual commands), one for the combos
    and the last one for the bitmaps used. Each element is identified by a command id that
    is a unique pair of guid and numeric identifier; the guid part of the identifier is usually
    called "command set" and is used to group different command inside a logically related
    group; your package should define its own command set in order to avoid collisions
    with command ids defined by other packages. -->

    <!-- In this section you can define new menu groups. A menu group is a container for
         other menus or buttons (commands); from a visual point of view you can see the
         group as the part of a menu contained between two lines. The parent of a group
         must be a menu. -->
    <Groups>
      <Group guid="guidSelectLinePackageCmdSet" id="MyMenuGroup" priority="0x0600">
        <Parent guid="guidSHLMainMenu" id="IDM_VS_MENU_TOOLS"/>
      </Group>
    </Groups>

    <!--Buttons section. -->
    <!--This section defines the elements the user can interact with, like a menu command or a button
        or combo box in a toolbar. -->
    <Buttons>
      <!--To define a menu group you have to specify its ID, the parent menu and its display priority.
          The command is visible and enabled by default. If you need to change the visibility, status, etc, you can use
          the CommandFlag node.
          You can add more than one CommandFlag node e.g.:
              <CommandFlag>DefaultInvisible</CommandFlag>
              <CommandFlag>DynamicVisibility</CommandFlag>
          If you do not want an image next to your command, remove the Icon node /> -->
      <Button guid="guidSelectLinePackageCmdSet" id="SelectLineCommandId" priority="0x0100" type="Button">
        <Parent guid="guidSelectLinePackageCmdSet" id="MyMenuGroup" />
        <CommandFlag>CommandWellOnly</CommandFlag> <!-- UIには表示せず、オプション->環境->キーボード から選択できるコマンドとして使用できる -->
        <Strings>
          <ButtonText>SelectLineCommand</ButtonText> <!-- ここで入力した文字列がコマンドの名前になる -->
        </Strings>
      </Button>
    </Buttons>

    <!--The bitmaps section is used to define the bitmaps that are used for the commands.-->
  </Commands>

  <Symbols>
    <!-- This is the package guid. -->
    <GuidSymbol name="guidSelectLinePackage" value="{730b399e-2570-4f0d-a534-730de1b5a5cb}" />

    <!-- This is the guid used to group the menu commands together -->
    <GuidSymbol name="guidSelectLinePackageCmdSet" value="{ac153145-5fe8-4263-aadd-cbcb67cbfe3d}">
      <IDSymbol name="MyMenuGroup" value="0x1020" />
      <IDSymbol name="SelectLineCommandId" value="0x0100" />
    </GuidSymbol>
  </Symbols>
</CommandTable>
終わりに
やってみた感想は、意外と簡単だった。
VSCodeにあったショートカットキーを移すくらいならサクッと実装できることが分かったので、今後も「こういう機能あったらな~」と思ったら自分で実装してしまうのが良いかもしれない。
これを読んだ誰かの拡張機能の開発の背中を押すことが出来れば幸いです。
終わり。
コメント